This is continued from the Pump Rooms section of Fever Dreams.
¶ Diorama Display
The player then proceeds through the facility and eventually enters a room with a diorama on a table that resembles a strange maze, and a section of Concord. Small British colonial era soldier models decorate the table.
The room has only one other door, and when activated, the player is hit with another FEV attack, and the door dissolves in front of them revealing a surreal outdoor landscape.
¶ The Hedge Maze
As the player walks through the outside area they will reach a walled hedge garden.
If the player tries to double back to see if they are still in the facility, they'll find the entryway behind them has changed, and the doorway no longer exists.
Their spouse is waiting for them just inside the hedge maze area.
Activating their spouse, the player will engage in a conversation about the nature of the hallucination and suggest they try and find their way through the maze together.
The maze is very small and has 6 arches. The goal is for the player to pass through the arches in a particular order without ever passing through the same arch twice. See image for path player is expected to take.
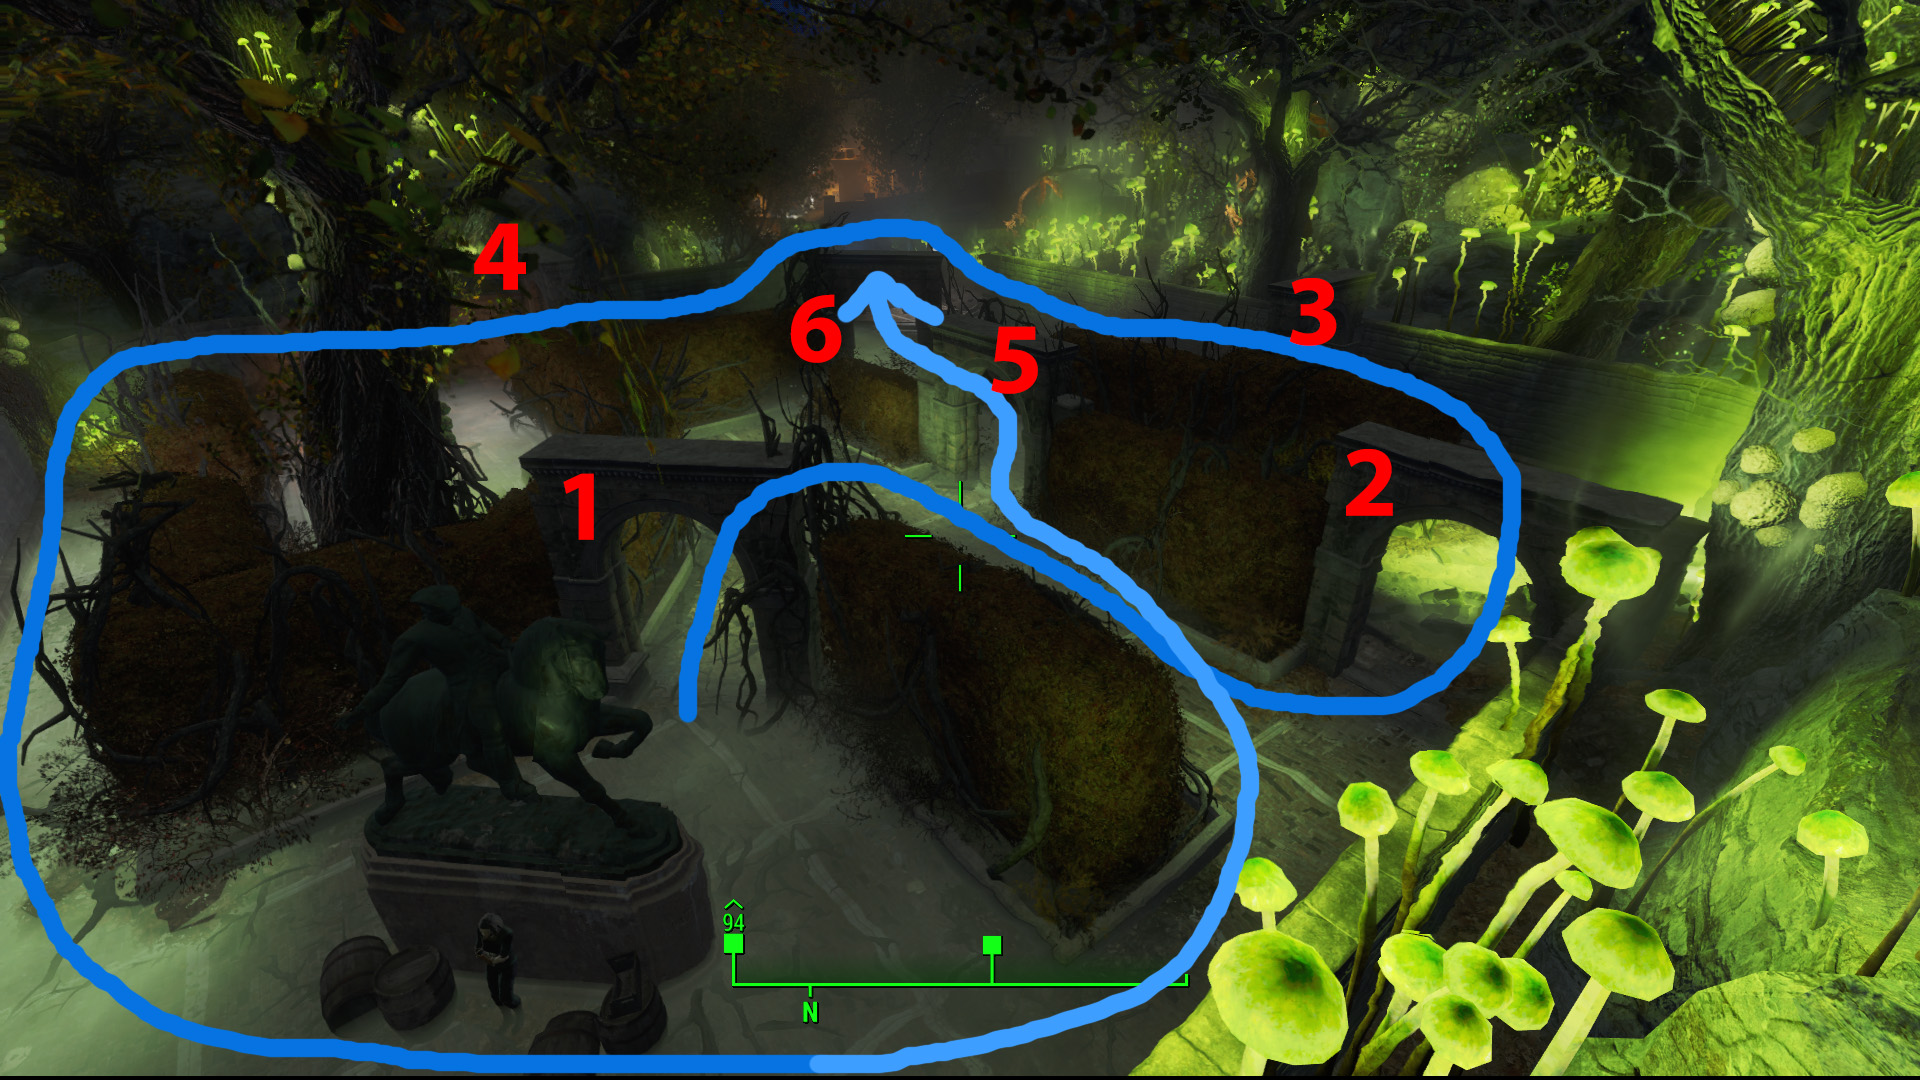
Passing through in the wrong order will cause the previous lit arches to reset and the spouse will comment on that fact. If the player fails enough times, the spouse will eventually tell the player they remember how it went so far and retrace the successful steps the player had made in their best attempt.
Once the player passes through all the arches in the correct order, a gate will open, revealing a path forward.
¶ The Light Puzzle
As the player makes their way forward, they find themselves near the entrance to a dark, small city street. The player will hear recorded voices similar to those heard in the Museum of Freedom. The voices hint at a curfew, and that the player should not be out at night.
Several clusters of British soldier mannequins will be found throughout the scene, each facing roughly towards the player. Anytime the player looks away from one, it will update its rotation to face the player's new location.
At the start of the street is a small stone fence with a gap in the middle, which marks the safe zone - going past it will trigger a flash to white, a fired musket sound, and the player will be teleported back to this point. Two spotlight control buttons are in easy reach from here.
Throughout this section, the player will find spotlights with nearby buttons. Pressing a button rotates the spotlight into one of three potential positions.
The player will need to position the spotlights to make themselves lit paths. As they proceed forward they will find switches that turn on additional permanent lights, giving them safe access to additional switches or paths.
The player’s spouse will comment with hints after a long enough time passes where the player fails to make significant progress.
Once the player creates paths that reach certain milestones, the spouse will comment that they can remake that path if the player desires. From that point forward, speaking to the spouse will bring up a dialogue option for each path the player has discovered, thus giving the player a quick reset mechanism if they experimented a bunch with switch positions and want to get back to where they were.
Note that one of the lights the player turns on will periodically fail, requiring the player to time their run through it to avoid being in the dark.
As a failsafe option for those who grow tired of the puzzle, the player can shoot all of the mannequins to bypass the entire puzzle. To help signal this, shooting one will have it disintegrate into a green shader, similar to the door melting shader seen when they first found this place. If the player shoots the last one, the spouse will comment that they solved the problem with violence.
There is a small bonus side path the player can find towards the right. At the end of this path, the player will find a button; pressing it will cause what seems like an earthquake to the player. They will find out shortly what this was...
Once the player makes it to the church at the end of the street and activates the door, they will hear their spouse behind them struggling.
¶ The Church
The player can speak to the spouse and will have a short conversation to urge them on.
The player’s objective marker at this point will be on a coffin inside the church. As they get close to it, the screen will flash white. A few seconds later, the white will drop and the scene will have changed. There are now people in the pews and someone standing leaning over the coffin.
Behind the player, their spouse is now gone, the door is shut, and the player will only be able to walk forwards.
As they get close to the man leaning over the coffin, he will turn around to reveal himself as Kellogg. A sound will play to remind the player of when their spouse was shot and the screen will flash white once more.
When it returns, the scene will change again. The people in the pews are skeletons, the coffin is open, and inside is the spouse. A pillow on their stomach holds a wedding ring. An activate option to inspect the spouse is available. Activating it triggers an animation, at the end of which, the screen flashes once more, and the player finds themselves back in the room with the diorama.
¶ Return to the Diorama Display
The path forward from here is through a double-door that was not there when the player entered this room originally. This door will trigger a load screen that leads to the Deep Labs section.
The door the player had went through to reach the hedge maze and town is no longer there, and the player will not be able to return to that hallucination.
¶ Secret Area
If the player found the secret button during the light puzzle, they will find the diorama table has slid out of position, and a hole to an optional area below has opened up.
Below, the player will find various loot including a legendary revolutionary sword. They can then follow the path and explore some of the side that Pike had been in - where the player may find additional Test Subjects to fight.
Ultimately, the player will need to circle back from there and drop through a hole in the floor next to a boss chest - which will drop them next to the diorama room again.