¶ Overview
East Empire Expansion includes Outposts for the 9 holds of Skyrim and the island of Solthsteim. These Outposts are detected at runtime and not a pre-programmed list, which means more can be added to new regions added by mods.
The below tutorial will walk you through setting up a new functional Outpost.
Some of the images in this tutorial will make it appear that Creation Kit has a "dark mode", which it does not. If you'd like this same dark mode, plus loads of bug fixes and other features, check out Creation Kit Platform Extended which is a community created update to the Creation Kit!
¶ Preparing East Empire Expansion
East Empire Expansion by default is not set up as a master plugin, meaning that the Creation Kit will break your new Outpost mod when you save it if you don't prepare first.
To prepare your local copy of East Empire Expansion for creating patches for, you'll need to add the ESM flag to its header.
To do this, you'll need to grab SSEEdit.
If you've never used this before, it's a mod editing tool that exposes a lot of information the Creation Kit doesn't. It's one of the most popular and poweful modding tools available.
- Open SSEEdit.
- After it loads, double-click kinggathcreations_eastempirecompany.esp.
- Once the data finishes loading, click the + symbol next to kinggathcreations_eastempirecompany.esp then click the File Header text near the top.
- In the right-hand panel, right-click the white area next to "Record Flags" and choose Edit.
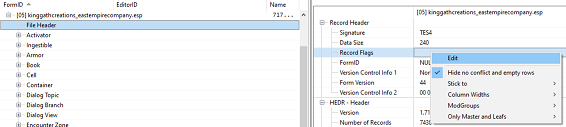
- Check in the ESM flag, and then click OK.
- Close SSEEdit, it will prompt you to save the changes, press OK to this prompt.
- Repeat these steps for the mod you are looking to add an Outpost to.
Your copy of East Empire Company and target mod will now allow mods to be parented to it in the Creation Kit. Note that players don't need to do this to their copies of EEE and the other mod to use your new Outpost patch, the game will allow mods to be parented to each other without this flag, it's simply a quirk of the Creation Kit that makes this a requirement for building your patch.
The next step is to open both East Empire Expansion and the mod you'd like to add an Outpost to in the Creation Kit.
- Open the Creation Kit.
- On the Data menu, check in kinggathcreations_eastempirecompany.esp and the mod you are looking to add an Outpost to. Click OK and wait for the Creation Kit to load the new files.
- Click save and give your new patch a name.
¶ Setting up Records
Before we start building the Outpost, we'll need a number of records created.
¶ Vendor Container
- In the Object Window, go to WorldObjects > Container and filter for kgcEEC_VendorContainer_Whiterun.
- Right-click that record and duplicate it.
- Give your duplicate a unique ID by right-clicking it and selecting Rename.
¶ Vendor Faction
This is used to connect the vendor NPC to the container. Note that until we place the container into the world, we won't be able to completely set up this record, so we'll need to come back to this in a future step.
- In the Object Window, go to Character > Faction and filter for kgcEEC_ServicesFaction_Whiterun.
- Right-click that record and duplicate it.
- Give your duplicate a unique ID by right-clicking it and selecting Rename.
¶ Vendor NPC
This will act as the actual NPC that the player interacts with at your Outpost.
For now we'll set them up as a copy of one of our NPCs, but you are welcome to customize race, appearance, and other details. If a tab you want to edit can't be edited, uncheck that tab name in the Template Data section on the lower left of the NPC's record.
- In the Object Window, go to Actors > Actor and filter for kgcEEC_OutpostMerchant_Whiterun.
- Right-click that record and duplicate it.
- Give your duplicate a unique ID by right-clicking it and selecting Rename.
- Open your new NPC record and go to the Factions tab.
- Right-click the kgcEEC_ServicesFaction_Whiterun and choose Delete.
- Right-click the blank area below the remaining Factions and choose New.
- In the window that pops-up, find and select the new faction you created in the previous section, then press OK.
- Go to the AI Packages tab, right-click in the blank box and choose Add - select the kgcEEC_MerchantSandboxOutpost package.
If you would like to give the merchant an evening and sleep package to go somewhere specific, check out the other kgcEEC_OutpostMerchant_ records for an example of AI Packages you could create to facilitate that. - Press OK to save the changes to the form.
¶ Sell For Player Deposit List
This is used for the automatic selling feature so the code can sort items.
- In the Object Window, go to Miscellaneous > FormList.
- Right-click in the right-half of the window and choose New.
- Give your list a unique ID, we recommend something like: <YourModPrefix>_BlankSortingList_SellForPlayerDepositList_<OutpostLocationName>
- Press OK to save the form.
¶ Production Leveled List
This is used for the Outpost to track the types of items gathered by location claim mining.
- In the Object Window, go to Items > LeveledItem.
- Right-click in the right-half of the Object Window and select New.
- Give your list a unique ID, we recommend something like: <YourModPrefix>_ProductionLL_<OutpostLocationName>.
- Check in the Use All box.
- Press OK to save the form.
¶ Other Records
The remaining location specific record edits will happen at the reference level - which means we place an object in the game world and then edit that specific reference of the item.
We'll cover all that in the next section.
¶ Placing Core Objects
First step is to head in game, and find a good location in the mod you'd like to patch for an Outpost.
If you need help translating the location in game to the Creation Kit details, you can use a mod like ShowCell to find the cell ID and coordinates your character is standing in-game.
This guide will not go into much detail about placing items in the world, and will assume you can find other modding tutorials for how to design your new Outpost.
Outposts are made up of multiple components, some are things the player interacts with (such as the delivery container), some are simply setdressing that represents the visual look of the Outpost, and some are invisible controller objects that connect everything together.
We're going to focus on the technical things for this tutorial and leave you to decorate with set dressing afterwards.
- Once you've determined the mod location you want to add your new Outpost to, open the Creation Kit and find the mod's worldspace and the cell you want to place the Outpost in the Creation Kit's Cell View window. Double-click that cell to open it in the Render Window.
We're now going to place a series of invisible items and then connect them all together, to make this easier, you'll want to separate them a bit so they don't get buried inside one another.
- Place the following items, and after placing each, double-click the reference and give it a unique Reference Editor ID, which will help you in identifying items later - to help you track them.
For naming references we'd recommend something like <YourModPrefix>_<ObjectType>_<LocationName>. For example, for the first item below, Outpost Controller, if you are placing it in part of Elsweyr (from mod Moonpath to Elsweyr), you might name the reference: YourModPrefix_OutpostController_Elsweyr.
-
Outpost Controller: This tells East Empire Expansion about your Outpost and connects all the other elements together. You can find this under WorldObjects > Activators, editor ID is kgcEEC_OutpostController.
-
Sell-For-Player Container: This invisible container will hold all the items the player puts up for the East Empire to sell. You can find this under WorldObjects > Containers, editor ID is kgcEEC_SellForPlayerContainer.
-
Delivery Service Drop-Off Container: invisible container will hold all the items the player has delivered as well as the cut of mined items from claimed locations (the actual player interactive versions will be placed as part of your set dressing later). You can find this under WorldObjects > Containers, editor ID is kgcEEC_DeliveryContainer_Hidden.
-
Vendor Container: This handles the East Empire merchant's sellable inventory for that camp, such as the East Empire Relics the player will want to be able to purchase. This is the container form you created in the previous "Setting Up Records" section.
-
Strongbox: This is an invisible container for the gold the player earns from items sold on their behalf (The actual player interactive versions will be placed as part of your set dressing later). You can find this under WorldObjects > Containers, editor ID is kgcEEC_StrongBoxHidden.
-
Ledger: This is an invisible object that handles displaying the Ledger to the player so they can see their numeric progress at a particular Outpost (The actual player interactive versions will be placed as part of your set dressing later). You can find this under WorldObjects > Activators, editor ID is kgcEEC_LedgerHidden.
-
Outpost Merchant: This is the merchant you created in the previous "Setting Up Records" section.
-
Delivery Team NPCs: The Delivery teams involve several NPCs and guards. You'll place the following Actors:
-- kgcEEC_DeliveryTeam_Leader
-- kgcEEC_DeliveryTeam_Assistant
-- 2 copies of kgcEEC_DeliveryTeam_LvlGuardImperial
-- kgcEEC_DeliveryTeam_LvlHorseSaddled
While we have designated NPCs set up for this, primarily the only thing that is important are their factions. So if you wanted to make new NPCs with different gear, stats, or even race (Morrowind Silt Strider instead of a Horse perhaps!), they should work so long as you give your new Actor records the same Factions as these.
-
Delivery Team Spawn Point: The place where the delivery team NPCs will first appear to travel from the Outpost towards wherever the player places a Relic for pick-up. For this we'll use an XMarkerHeading which can be found under WorldObjects > Static.
-
Delivery Team Travel Markers: To help guide the Delivery Team to and from Relic pick-ups we set up a series of XMarkerHeadings associated with their AI packages that we move to various places. Rather than using the XMarkerHeading record, we have 4 unique records that can be dynamically detected by form type, place one of each of the following:
-- kgcEEC_XMarkerHeading_TravelToDeliveryContainer
-- kgcEEC_XMarkerHeading_TravelToPickup
-- kgcEEC_XMarkerHeading_TravelToDelivery
-- kgcEEC_XMarkerHeading_TravelToPickupContainer
- Outpost Level Enable Parents: These allow you to setup different set dressing for each level of the Outpost so the player can see visual progress as the player engages more with the system. Place 4 copies of XMarker in a row next to one another (Found under WorldObjects > Static) and give them each a reference ID that identifies them with a level number. We recommend something like <YourModPrefix>_OutpostLevelParent_<LocationName>_L<LevelNumber>
For example, if you are creating an outpost for Elsweyr, your 4 markers could be named:
YourModPrefix_OutpostLevelParent_Elsweyr_L1
YourModPrefix_OutpostLevelParent_Elsweyr_L2
YourModPrefix_OutpostLevelParent_Elsweyr_L3
YourModPrefix_OutpostLevelParent_Elsweyr_L4
- Map Marker: This is optional, but makes it easier for players to find the camp. You can find this under WorldObjects > Static, editor ID is MapMarker.
¶ Setting Up Core Objects
Now that our core objects are placed in the world, we're going to go over the steps needed to configure each.
For these steps, many of the items are flagged as Markers, meaning they won't render in game. If the items are invisible for you in the Creation Kit as well, press the letter M on your keyboard while the Render Window is active to toggle the display of Marker items.
For this section, you will need to know the Location record the cell uses, or one that is close by, as well as the Parent Location for the region. You can find Location parent information by navigating to World Data > Location in an Object Window and opening a Location record. Locations can be chained together so if you look at the Cell's Location record and see it has a Parent Location, open that Parent Location and look at it's record to see if it also has a Parent, and so on.
-
Outpost Controller
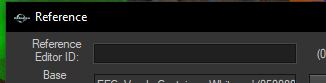
This is the heart of the Outpost, it contains a script that controls most functionality and must be linked to many of the other items.a. Double-click the Outpost Controller you placed to open the Reference properties window.
b. At the bottom of the Reference window are a series of checkboxes, uncheck any of them that are checked in.
c. Go to the Location Ref Type tab and select kgcEEC_LocRefType_EECOutpost from the dropdown.
d. Go to the scripts tab and double click the Script that's there to bring up the properties screen.
-
Double-click bTerritoryHasRulerToConvince and make sure the box is unchecked. Unchecking this will ensure the Claim System works automatically once its available during the questline, without the player having to convince any ruler for your new Outpost. (If you are looking to set up someone the player has to convince to allow for the claim system to work for this area, check out the kgcEEC_ConvinceRuler_ quests for examples of how to set this up)
-
Double-click ForceLocation and point it to the Location record that represents the area you are in currently. Generally each Cell will have a Location record associated with it that you can find by right-clicking the Cell name in the Cell View window and selecting Edit - this will display a menu that includes the Location record name.
-
If you placed a MapMarker, double-click the kForceMapMarker, and point the property at the MapMarker you placed.
-
Double-click LevelEnabledParents, click Add 4 times to add 4 entries. Set each of them in order to the 4 XMarkers you placed to act as the Outpost Level Enable Parents.
-
Double-click MyProductionLeveledList and point it to the LeveledItem you created in the "Setting Up Records" section.
-
Double-click TerritoryLocation and select the region location. If you are just adding one Outpost to cover the entire land the mod added, this could be the highest level location for this land, otherwise it could be the parent location to the location you set as the ForceLocation.
e. The rest of the Outpost's script properties should remain default, so press OK to save the script changes.
f. Go to the Linked Ref tab.
g. Right-click in the center area and choose New.
h. Click the "Select Reference in Render Window" and then double-click the Delivery Service Drop-Off Container you placed in the world.
i. In the Keyword dropdown, select the keyword kgcEEC_Link_OutpostToDeliveryContainer.
j. Press OK to save the Linked Ref. It should now appear in the list on the Linked Refs tab.
k. Repeat steps g through j for the following combinations:
| Reference | Keyword |
| ========= | ======= |
| Delivery Team Leader | kgcEEC_Link_OutpostToDeliveryTeamLeader |
| Delivery Team Assistant | kgcEEC_Link_OutpostToDeliveryTeamAssistant |
| 1st Delivery Team Guard | kgcEEC_Link_OutpostToDeliveryTeamGuard01 |
| 2nd Delivery Team Guard | kgcEEC_Link_OutpostToDeliveryTeamGuard02 |
| Delivery Team Horse | kgcEEC_Link_OutpostToDeliveryTeamCreature |
| Sell-For-Player Container | kgcEEC_Link_OutpostToForSaleContainer |
| Ledger Activator | kgcEEC_Link_OutpostToLedger |
| Outpost Merchant | kgcEEC_Link_OutpostToMerchant |
| Merchant Container | kgcEEC_Link_OutpostToMerchantContainer |
| Delivery Team Spawn Point | kgcEEC_Link_OutpostToSpawnPoint |
| Strongbox | kgcEEC_Link_OutpostToStrongbox |
Double-check that the list of Linked Refs has 12 entries and that none of them say the word None - if they do, it means you either forgot to set the Keyword, or overwrote the link to a reference you had already selected. If any are missing, it will cause the Outpost to not work correctly and the problem will be baked into any save files using the patch.
Press OK again to save the changes to the Outpost Controller reference.
-
Sell-For-Player Container
Double-click the Sell-For-Player Container you placed to open the Reference properties window.a. Uncheck all boxes at the bottom of the reference properties.
b. Go to the scripts tab and double-click the Scripts tab.
c. Set the DepositedItemTypesList to the unique formlist you created in the "Setting Up Records" section.
d. Click OK to save the script changes.
e. Click OK to save the reference changes. -
Delivery Service Drop-Off Container
Double-click the Delivery Service Drop-Off Container you placed to open the Reference properties window.a. Uncheck all boxes at the bottom of the reference properties.
b. Go to the Location Ref Type tab, and select kgcEEC_LocRefType_DefaultDropOffContainer from the list.
c. Click OK to save the reference changes. -
Vendor Container
This is one of the few items that will retain the default "Respawns" flag, so you don't actually have to change anything on the reference itself for this one.
Now that you have your Vendor Container placed in the world, you can update the Faction record to ensure your merchant references the correct inventory.
Open the Faction record you created in the previous "Setting Up Records" section and go to the Vendor tab. On the right-hand side you should find the words "Merchant Container", click the "Select Reference in Render Window" button, this will then focus on the Render Window and change your cursor, double-click your Vendor Container to set it.
If your Render window wasn't angled in such a way that you could click on the container easily, or something was blocking selecting it, right-click to cancel selecting anything so that you can reposition the camera or hide items to make it easier to select.
After updating the Faction record, click OK, and your Vendor Container will now be ready to go.
-
Strongbox
Double-click the Strongbox Container you placed to open the Reference properties window.a. Uncheck all boxes at the bottom of the reference properties.
b. Click OK to save the reference changes. -
Ledger
Double-click the Ledger Activator you placed to open the Reference properties window.a. Uncheck all boxes at the bottom of the reference properties.
b. Click OK to save the reference changes. -
Outpost Merchant
Double-click the Ledger Activator you placed to open the Reference properties window.a. At the bottom of the reference window, check in "Initially Disabled". Respawns should also be checked in but be greyed out so that you couldn't change it anyway. Aside from those two, all other checkboxes should be unchecked.
b. Go to the Persist Location tab and select the location from the dropdown that matches the location you set as the ForceLocation for the Outpost Controller.
c. Click OK to save the reference changes. -
Delivery Team NPCs
For all 5 of the delivery team members do the following:a. Double-click the NPC you placed to open the Reference properties window.
b. At the bottom of the reference window, check in "Initially Disabled". All other checkboxes should be unchecked.
c. Go to the Persist Location tab and select the location from the dropdown that matches the location you set as the ForceLocation for the Outpost Controller.
d. Then go to the Linked Refs tab and set up Linked Refs like you did for Outpost Controller based on the tables below each NPC listed below.
e. Once all Linked Refs are set up, you can click OK to save the property changes for that NPC reference.
¶ Leader
| Reference | Keyword |
| ========= | ======= |
| Delivery Team Travel Marker - TravelToDelivery | kgcEEC_Link_TravelToDelivery |
| Delivery Team Travel Marker - TravelToDeliveryContainer | kgcEEC_Link_TravelToDeliveryContainer |
| Delivery Team Travel Marker - TravelToPickup | kgcEEC_Link_TravelToPickup |
| Delivery Team Travel Marker - TravelToPickupContainer | kgcEEC_Link_TravelToPickupContainer |
| Delivery Team Spawn Point | kgcEEC_Link_TravelToSpawnPoint |
¶ Assistant
| Reference | Keyword |
| ========= | ======= |
| Delivery Team Leader NPC | Don't select a Keyword for this one |
| Delivery Team Travel Marker - TravelToDelivery | kgcEEC_Link_TravelToDelivery |
| Delivery Team Travel Marker - TravelToDeliveryContainer | kgcEEC_Link_TravelToDeliveryContainer |
| Delivery Team Travel Marker - TravelToPickup | kgcEEC_Link_TravelToPickup |
| Delivery Team Travel Marker - TravelToPickupContainer | kgcEEC_Link_TravelToPickupContainer |
| Delivery Team Spawn Point | kgcEEC_Link_TravelToSpawnPoint |
¶ Guards and Horse
| Reference | Keyword |
| ========= | ======= |
| Delivery Team Leader NPC | Don't select a Keyword for this one |
| Delivery Team Travel Marker - TravelToDelivery | kgcEEC_Link_TravelToDelivery |
| Delivery Team Travel Marker - TravelToPickup | kgcEEC_Link_TravelToPickup |
| Delivery Team Spawn Point | kgcEEC_Link_TravelToSpawnPoint |
-
Delivery Team Spawn Point
Double-click the XMarkerHeading for the Delivery Team Spawn Point you placed to open the Reference properties window.a. Uncheck all boxes at the bottom of the reference properties.
b. Go to the Location Ref Type tab and select kgcEEC_LocRefType_DeliveryTeamOrigin from the dropdown.
c. Click OK to save the reference changes. -
Delivery Team Travel Markers
For each of them, double-click the marker you placed to open the Reference properties window.a. Uncheck all boxes at the bottom of the reference properties.
b. Click OK to save the reference changes. -
Outpost Level Enable Parents
For each of the enable parent xmarkers, double-click the reference to open the Reference properties window.a. Uncheck all boxes at the bottom of the reference properties.
b. Then check in the Initially Disabled check box.
c. Click OK to save the reference changes. -
Map Marker
If you opted to place a Map Marker, double-click the reference to open the the Reference properties window.a. Go to the Marker Data tab, check in Marker Data.
b. Enter a name for your camp, we recommend something like East Empire Camp <LocationName>. For example, East Empire Camp Elsweyr.
c. Choose a marker type from the drop-down that feels appropriate. We generally use the Camp icon.
d. Click OK to save the reference changes.
¶ Adding Set Dressing
The next step is where you get to take over and build creatively. While building, you'll want to include a few particular items as activators so the player can actually use the location.
-
Delivery Container Proxy - There are a series of Activators with the prefix kgcEEC_DeliveryContainerProxy. Be sure each level has one of these so the player can access deliveries.
-
Strongbox Proxy - There are a series of Activators with the prefix kgcEEC_StrongBoxProxy. Be sure each level has one of these so the player can access caps they earned.
-
Ledger Proxy - There is an Activator called kgcEEC_LedgerProxy_LedgerModel that each level will need so the player can view the Ledger.
-
Furniture Markers - Both the Merchant and Sha'khar have sandbox packages that will make them use various Furniture markers around the Outpost (centered around the position you place the Merchant). You'll want to be sure you have several Furniture items at each level they can use.
After you build a level, you'll want to connect all the items to the corresponding Enable Marker.
- Select the items from your level (even if you can't select them all in one go, it's fine, you can repeat these steps multiple times).
- Press the - key on your keyboard to bring up the Batch Dialog.
Make sure you have Render Window active. If that still doesn't work for you, click Edit > Render Window Hotkeys and look for "Toggle batch dialog" to find the hotkey. - Choose Set enable parent.
- At the bottom left, click the Select Reference In Render Window and then double-click the corresponding level marker.
- Press Do, to apply the enabled parent status.
This will make it so the items are controlled by the visibility of that marker in-game so the Outpost code can handle hiding and displaying them.
As an added bonus, you can now use this to help you with level design. If you right-click one of the XMarkers and choose Select Enable State Children it will select all of the items you have enable parented to it. From there, you can press 1 on your keyboard to hide all of those items.
¶ Triggering The Outpost
The last thing you need to do to make this work, is trigger the Outpost to be available.
You can do this in a couple of different ways:
-
If you are comfortable with scripting, you can setup a script yourself to trigger it. There is a function on the Outpost Manager quest script: kgEEC_OutpostManager. The function is called: EstablishOutpostForLocation and has the following parameters: (Location akLocation, Bool abFromRulerApproval = true, Float afDelayConstructionDays = 1.0, Bool abIgnoreLoadedState = false)
-
You can add a script to your Outpost Controller that will cause it to enable the next time the player enters the area after East Empire's questline has started. If you are reading this after patch 1.0.8, you'll find a script included with East Empire Expansion called kgcEECAutoOutpostTrigger.
If before 1.0.7, you can create this script yourself and attach it to your controller:
Scriptname <MyModPrefix>EEEOutpostTrigger extends ObjectReference

Event OnCellLoad()
    GlobalVariable kgcEEC_TotalOutpostsEstablished = Game.GetFormFromFile(0x002348B9, "kinggathcreations_eastempirecompany.esp") as GlobalVariable

    if(kgcEEC_TotalOutpostsEstablished.GetValueInt() > 0)
        (Self as kgEEC_Outpost)._Establish(false, 0.0, true)
    endif
EndEvent
Important! Replace the <MyModPrefix> in the code above with something unique so that your script doesn't get replaced by another patch also making their own, as if they decide to edit theirs, it may conflict with yours.
That's it!
Your Outpost should be dynamically detected the first time the area loads and so long as you have the appropriate objects in place and linked to the Outpost Controller, it should function like the rest of the Outposts in East Empire Expansion.